Achieve professional sound quality with a budget microphone or lavalier mic.
In the world of online video, the common wisdom is that "Content is King." While true, it overlooks a critical truth: Audio is Queen. A viewer will tolerate slightly blurry video if the sound is excellent, but they will quickly click away from high-definition video if the audio is poor, muffled, or riddled with distracting noise. Achieving clear audio is the single most effective, yet often overlooked, way to boost viewer retention and elevate the perceived professionalism of your content.
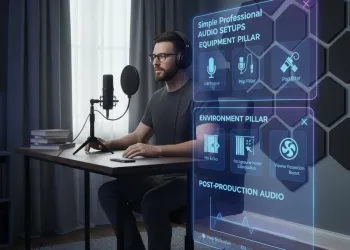
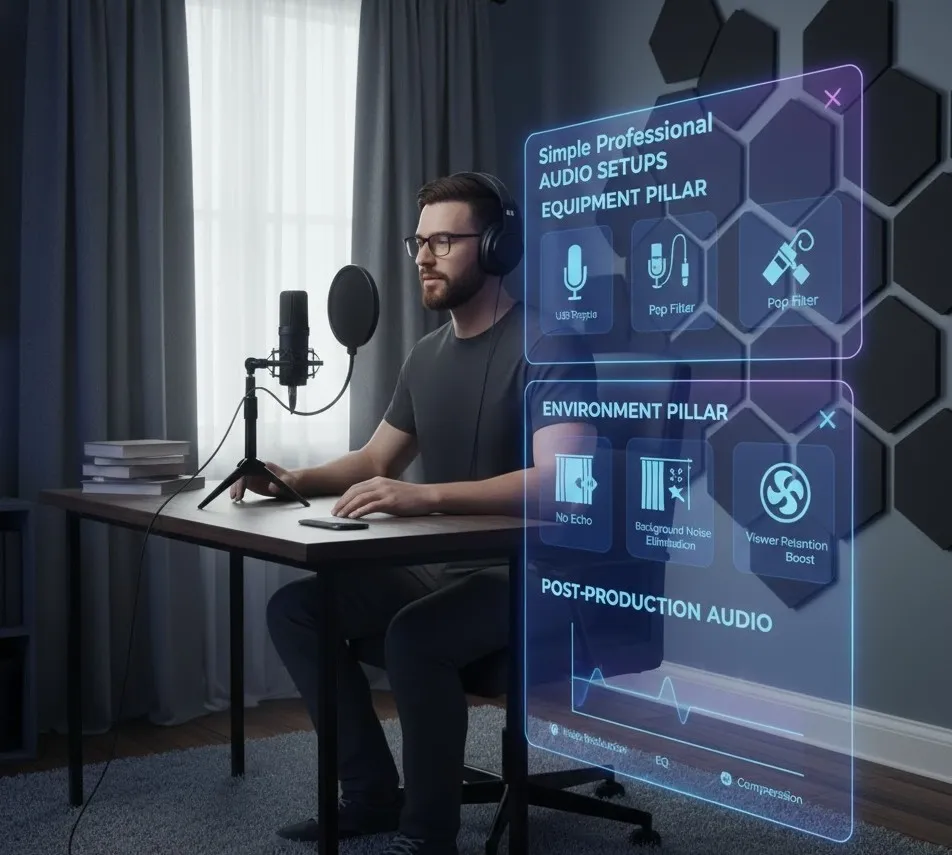
This guide details a straightforward, budget-conscious strategy for achieving professional sound quality for talking-head videos, voiceovers, and interviews. We will cover equipment choices, crucial room setup tips to ensure no echo, and simple post-production audio techniques that polish your final product. The key is recognizing that superior audio doesn't require complex, expensive gear; it requires intention and mastering a few simple techniques.
The Equipment Pillar: Selecting the Right Budget Microphone
The journey to clear audio begins with selecting the right microphone for your needs. Forget the expensive studio condenser mics initially; focused sound quality can be achieved affordably.
A. The USB Microphone (The All-Rounder)
For creators recording voiceovers, interviews, or solo commentary at a desk, a USB microphone is the simplest path to great sound.
- Recommendation: Look for high-quality USB condenser microphones in the mid-range budget. These often offer cardioid polar patterns, which primarily capture sound directly in front of them, helping to eliminate ambient background noise.
- Setup Tip: Position the mic close to your mouth (4-6 inches) but slightly off-axis (pointing toward your chin rather than straight at your lips). This avoids plosives (P and B sounds) and sibilance (sharp S sounds) while keeping your voice crisp.
B. The Lavalier Mic (The Invisible Workhorse)
For creators who move around, film standing up, or need a visually clean frame, a lavalier mic (or lapel mic) is essential.
- Wired Lavalier: Extremely affordable and excellent for achieving consistent volume and clarity. The closer the mic is to the source (your mouth), the better the signal-to-noise ratio, minimizing the impact of the room.
- Wireless Lavalier (Modern Budget Systems): Modern wireless systems, especially those using 2.4 GHz digital transmission, have become highly affordable and deliver reliable sound quality. These offer the greatest freedom of movement.
- Setup Tip: Clip the lavalier mic 6-8 inches below your chin, centered on your chest. For better sound, clip it upside down, which helps minimize breath noise and clothing rustle.
C. Accessories for Isolation
No microphone, regardless of price, can fix a noisy environment. Two simple accessories are crucial:
- Pop Filter / Windscreen: A pop filter sits between you and the microphone to block plosive sounds. A foam windscreen is essential for lavalier mics to reduce wind noise or clothing rustle.
- Shock Mount / Desk Stand: Isolate your microphone from physical vibrations, such as typing on a desk or bumping the camera tripod.
The Environment Pillar: Eliminating Background Noise and No Echo
The room you record in is arguably more important than the microphone you use. Even the best budget microphone will sound terrible in a reverberant space.
A. Taming the Echo (No Echo Technique)
Echo, or reverb, occurs when sound waves bounce off hard, parallel surfaces (walls, floor, ceiling). This makes your voice sound distant and unprofessional.
- Introduce Soft Surfaces: The simplest fix is to add textiles. Rugs on hard floors, heavy curtains over windows, bookshelves filled with books, and upholstered furniture all absorb sound.
- Use Acoustic Panels (The Budget Hack): If you can’t afford professional acoustic panels, hang thick blankets, moving pads, or heavy quilts behind the camera and off-screen. This is especially effective when recording voiceovers at a desk.
- The "Closet Trick": For flawless clear audio, record voiceovers or solo segments inside a walk-in closet filled with hanging clothes. The clothes act as natural, perfect acoustic dampeners, ensuring virtually no echo.
B. Eliminating Background Noise (The Triple Check)
Always conduct a "silent" recording for 30 seconds before you start speaking to capture the ambient room noise.
- Unplug/Turn Off Fans, AC, and Refrigerators: These mechanical noises are often low-frequency and difficult to remove in post-production audio without affecting your voice.
- Use Dynamic Mics (When Possible): Dynamic microphones are less sensitive to ambient noise than condenser microphones, making them excellent choices for less-than-perfect acoustic environments.
- Use Noise Gates (Advanced Technique): A noise gate automatically mutes the microphone signal when the input drops below a certain volume level, eliminating hums or hisses during silent breaks.
The Post-Production Audio Pillar: Polishing the Crisp Voiceovers
No recording is perfect. Post-production audio is where you take good raw sound and turn it into polished, professional clear audio.
A. Essential Editing Steps (The Clarity Trifecta)
Use any standard video editing software (DaVinci Resolve, Premiere Pro, Final Cut Pro) or free audio software (Audacity) to apply these three steps:
- Noise Reduction: Use a noise reduction tool to sample the ambient background noise you captured earlier (the 30-second "silent" clip). The software then subtracts that noise profile from the rest of your recording. Caution: Use this sparingly! Overusing noise reduction can introduce a robotic, digital sound to your voice.
- Normalization/Loudness: Viewers shouldn't have to adjust their volume between videos. Normalize your audio to an industry-standard loudness level (e.g., -14 LUFS for YouTube, -16 LUFS for podcasts). This makes your final clear audio consistently loud and engaging.
- EQ (Equalization): This step boosts the frequencies that make your voice sound professional.
- Boost 100-200 Hz: Adds "warmth" or "body" to your voice.
- Slightly reduce 200-500 Hz: Removes "boxiness" or "muddiness."
- Boost 2,000-5,000 Hz: Adds "presence," "clarity," and creates that satisfying, crisp voiceovers quality.
B. Compression (The Retention Boost)
Compression is key to consistency and a huge factor in viewer retention. It reduces the dynamic range of your audio, making loud parts quieter and quiet parts louder.
- Goal: To ensure the difference between your quietest word and your loudest word is minimal.
- Result: The listener doesn't have to strain to hear a whisper or jump to turn down a shout. This creates a comfortable listening experience, keeping them watching longer.
Semantic Search and Intent Keywords for Audio Quality
To ensure creators find this essential information, the content must be optimized with the intent of solving specific audio problems.
Intent Keyword Cluster: Microphone Solutions | Semantic Search Term Examples: Best budget mic for YouTube, affordable lavalier mic, USB vs XLR for beginners, cheap recording equipment. | Application in Content: Used in product recommendations and equipment discussions.
Intent Keyword Cluster: Acoustic Treatment | Semantic Search Term Examples: How to get no echo in recordings, acoustic foam alternatives, DIY soundproofing, reduce room reverb. | Application in Content: Used in the environment and room setup sections.
Intent Keyword Cluster: Voiceover Clarity | Semantic Search Term Examples: How to get crisp voiceovers, post-production audio tips, eliminate background noise in Audacity, voice normalization settings. | Application in Content: Used in the post-production audio workflow section.
Intent Keyword Cluster: Viewer Retention | Semantic Search Term Examples: Why audio quality matters for viewer retention, how to keep viewers watching, professional audio for content creators. | Application in Content: Used in the introduction and conclusion, tying audio quality directly to business success.